Sensor Attachment Guide

Thank you for choosing AXG Sleep Diagnostics. The following steps will guide you through the set up process. Please note that the testing must be done the night the testing equipment is received.

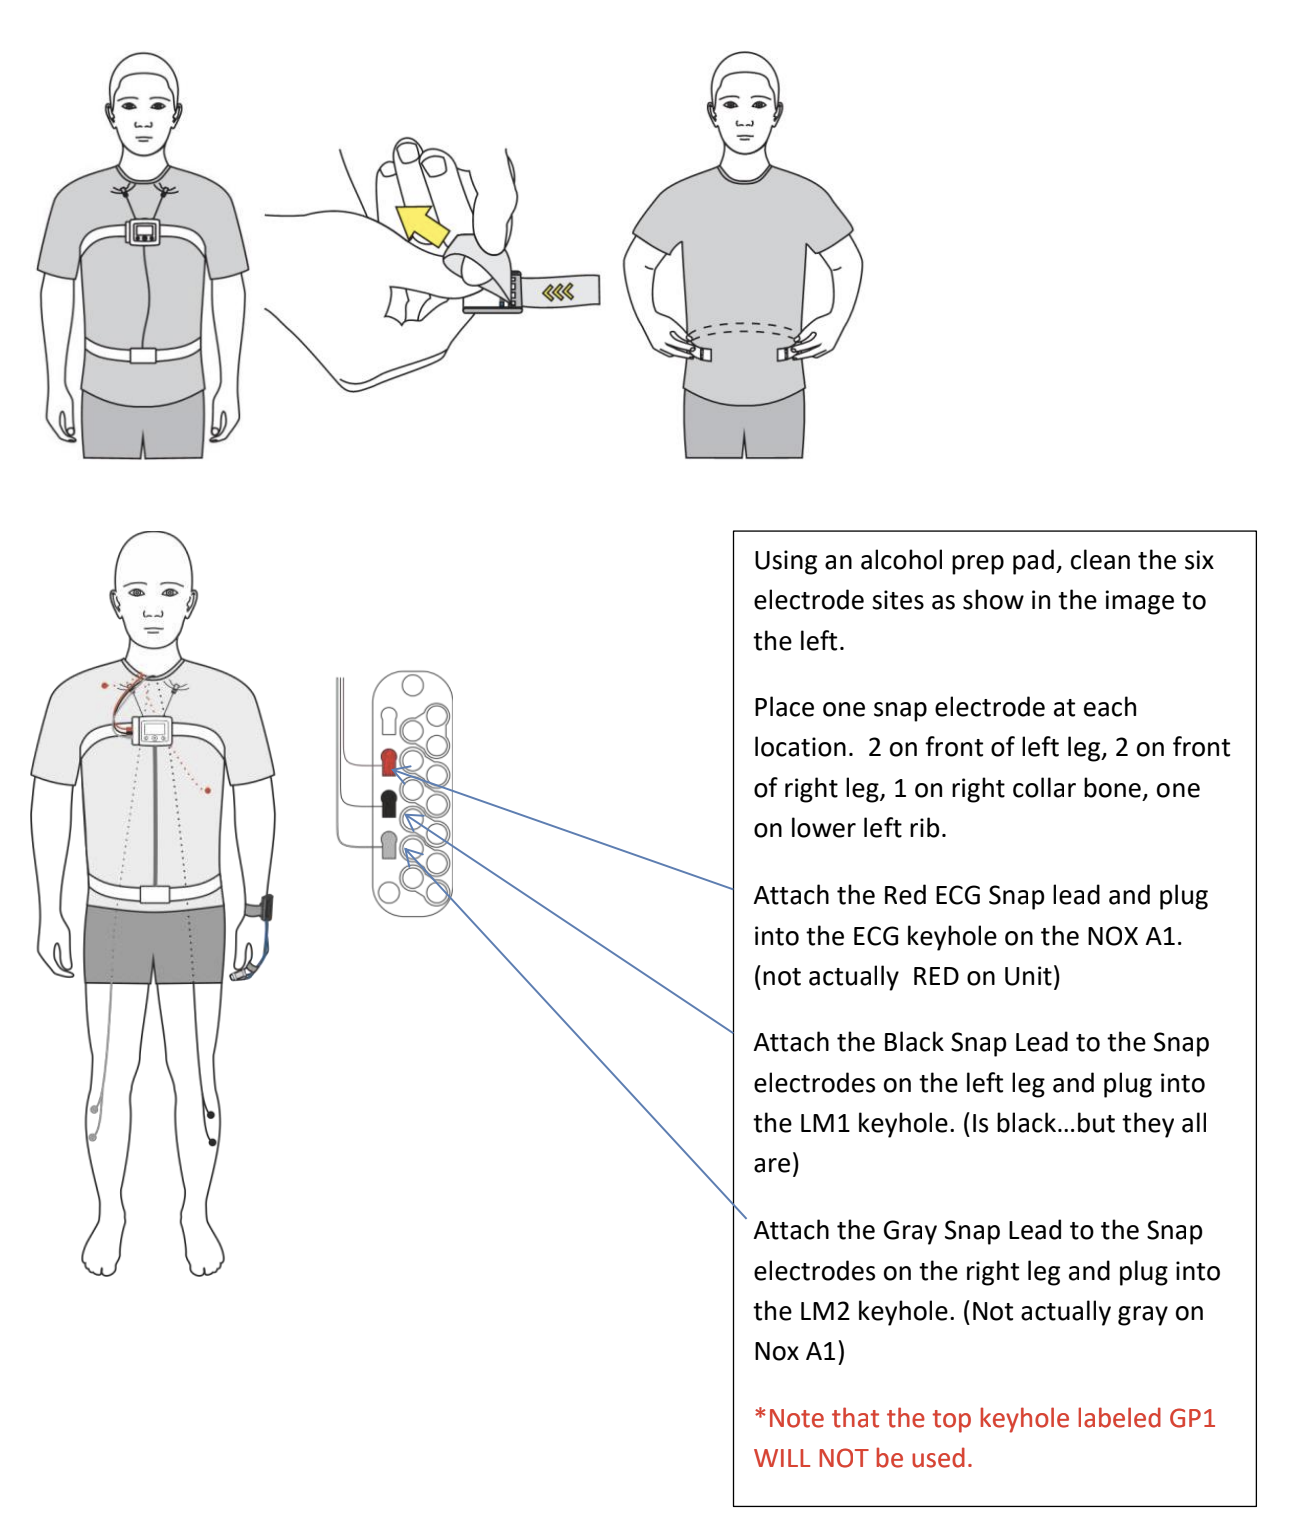
Step 1:

Clean and prep skin for electrode and sensor attachment. Skin must be clean and free of lotions before attaching electrodes and sensors. Signal quality will be adversely affected if they are applied before a shower or bath. Limiting perspiration during the test is important. Keeping a fan on during the night is advisable. You should be in your sleep attire prior to attaching electrodes and sensors.
Step 2:

Size and attach the belts and Alice PDx holder. Note: belt wires will already be attached, but will have to be temporarily unplugged to put the belts around your torso.

The images to the left show how to adjust the length of the belts. Size each belt so that it starts to stretch when the belt clips are approximately 4 inches apart.
Size the belts before putting them on. The images to the left show how to adjust the length of the belts. Size each belt so that it starts to stretch when the belt clips are approximately 4 inches apart.
Size and fasten one belt around your chest and the other belt around your stomach/abdomen. These should feel snug. Failure to have the belts snug enough will result in error messages during the night. Note that the Alice PDx holder is attached to the chest belt with the lanyard around the neck.

Size and fasten one belt around your chest and the other belt around your stomach/abdomen. These should feel snug. Failure to have the belts snug enough will result in error messages during the night.

Note that the Alice PDx holder is attached to the chest belt with the lanyard around the neck.

Completed belt set-up. Note that the chest belt wires face down, while the abdominal belt wires face up. Plug the blue inputs of each belt wire into the Alice PDx. Chest belt plugs into “Thoracic”. Stomach belt plugs into “Abdominal”.

Completed belt set-up. Note that the chest belt wires face down, while the abdominal belt wires face up. Plug the blue inputs of each belt wire into the Alice PDx. Chest belt plugs into “Thoracic”. Stomach belt plugs into “Abdominal”.

Clip the Alice PDx into the holder on the Chest Belt. Make sure that each side of the Alice PDx is secured by the clips as seen in Figure 4.

Clip the Alice PDx into the holder on the Chest Belt. Make sure that each side of the Alice PDx is secured.

Plug the ExG Yoke into the Alice PDx<br />
Module as seen in Figure 5. The<br />
yokes are color coded and labeled on<br />
the Alice PDx Module.<br />
The yokes can be attached to the<br />
Velcro straps on the belt, or put<br />
under the belt to keep out of the<br />
way.

Plug the ExG Yoke into the Alice PDx Module. The yokes are color coded and labeled on the Alice PDx Module. The yokes can be attached to the Velcro straps on the belt, or put under the belt to keep out of the way.

Step 3:

Attach ECG electrodes. You will need three (3) disposable electrodes, cloth tape, and 1-2 alcohol prep pads.


Firmly scrub the following locations using an alcohol prep.</p>
<p>End of collar bone (clavicle) near left shoulder.<br />
End of collar bone (clavicle) near right shoulder.<br />
On lower left rib.</p>
<p>Now attach a self-adhesive electrode to each location. Place a 1 1⁄2 to 2 inch piece of cloth tape over each electrode for added security if desired. It is unlikely these will become dislodged.

Firmly scrub the following locations using an alcohol prep.

  1. End of collar bone (clavicle) near left shoulder.
  2. End of collar bone (clavicle) near right shoulder.
  3. On lower left rib.

Now attach a self-adhesive electrode to each location. Place a 1 1⁄2 to 2 inch piece of cloth tape over each electrode for added security if desired. It is unlikely these will become dislodged.

Plug these electrodes into the corresponding<br />
location on the EKG yoke seen in Figure 7.<br />
Electrode near left shoulder plugs into LA.<br />
Electrode near right shoulder plugs into RA.<br />
Electrode on left lower rib plugs into ‘V’.

Plug these electrodes into the corresponding location on the EKG yoke.

  • Electrode near left shoulder plugs into LA.
  • Electrode near right shoulder plugs into RA.
  • Electrode on left lower rib plugs into ‘V’.

Step 4:

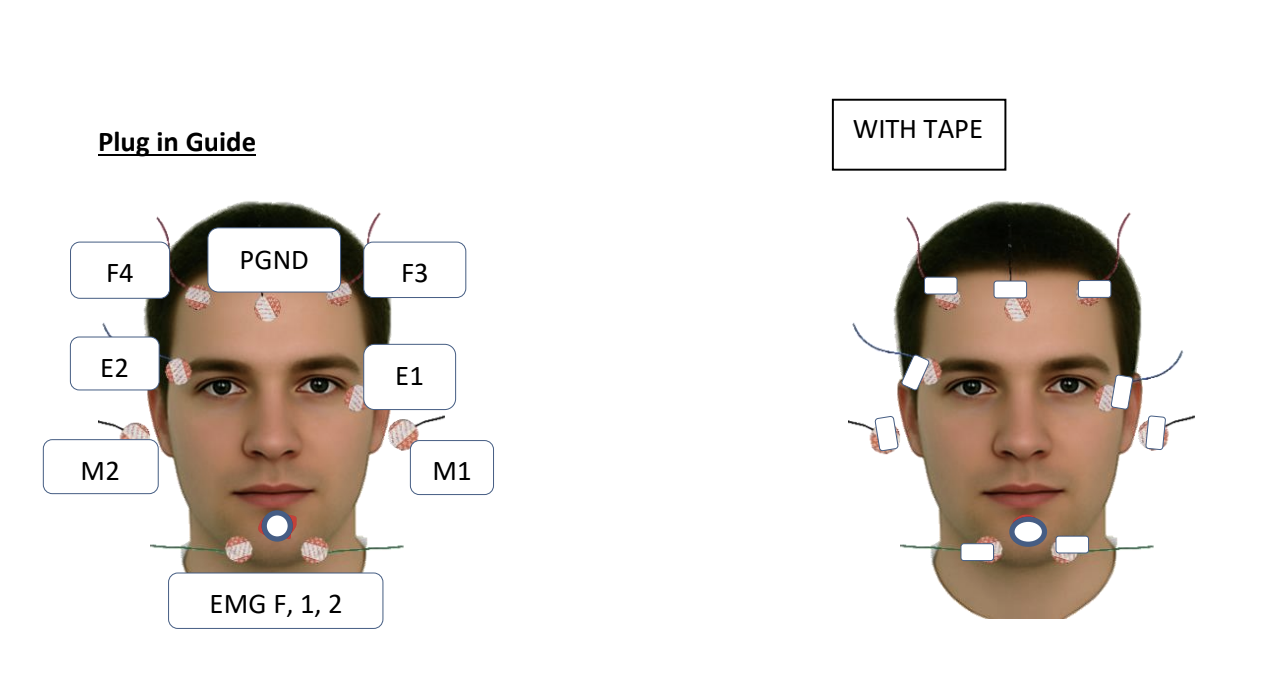
Prep and attach electrodes of the head and face. Note: Electrode color is NOT important. Where the electrode plugs in is critical.
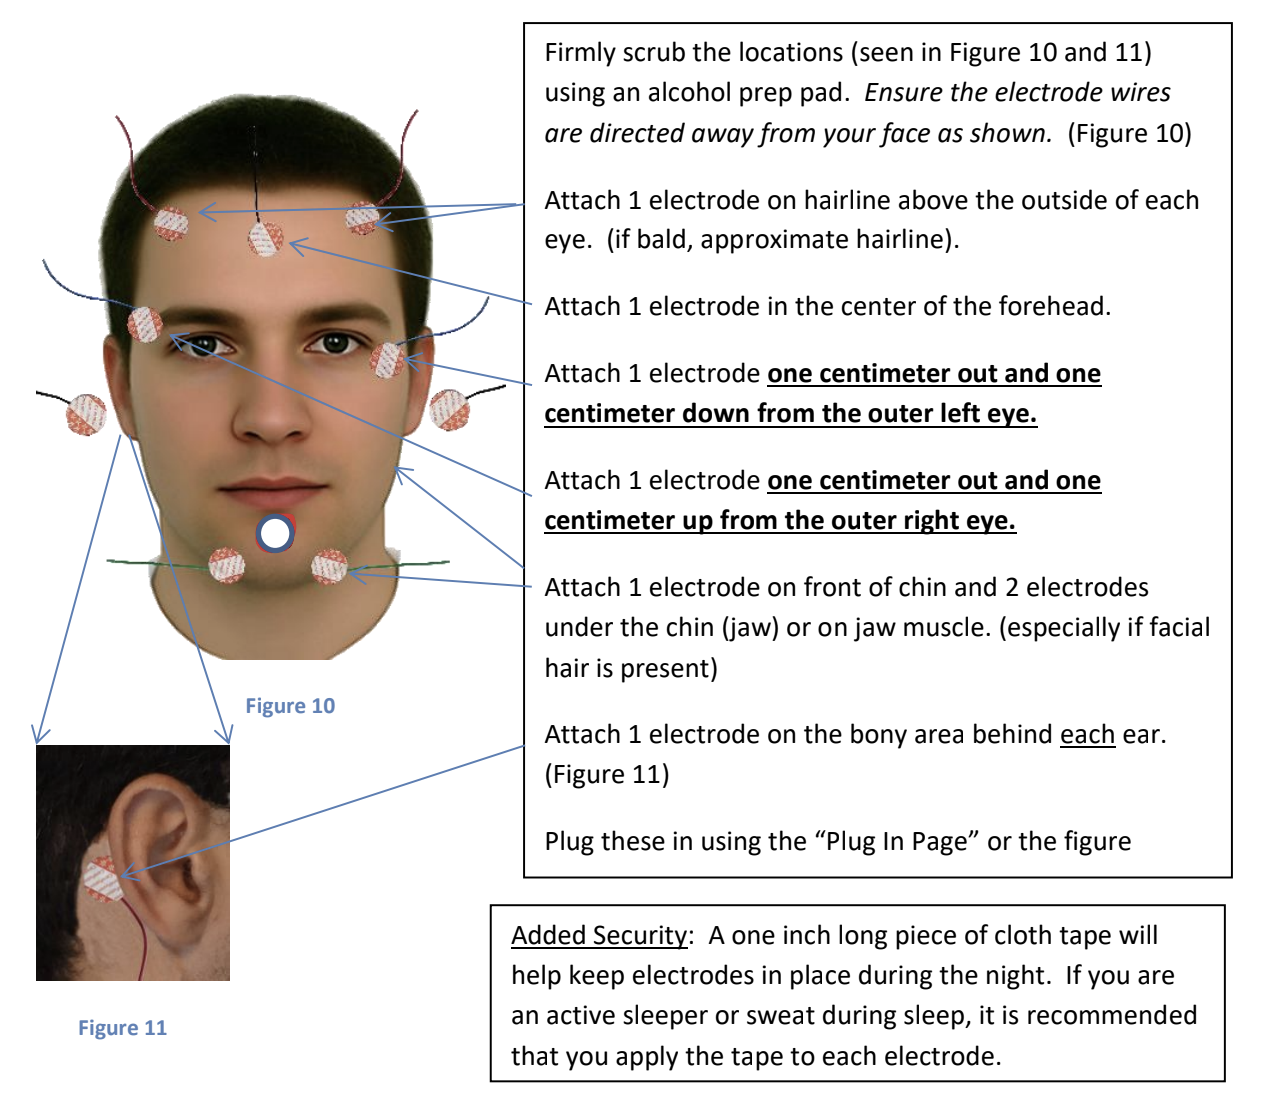
Firmly scrub the locations (seen in Figure 10 and 11) using an alcohol prep pad. Ensure the electrode wires are directed away from your face as shown. (Figure 10)

Firmly scrub the locations using an alcohol prep pad. Ensure the electrode wires are directed away from your face as shown.

  • Attach 1 electrode on hairline above the outside of each eye. (if bald, approximate hairline).
  • Attach 1 electrode in the center of the forehead.
  • Attach 1 electrode one centimeter out and one centimeter down from the outer left eye.
  • Attach 1 electrode one centimeter out and one centimeter up from the outer right eye.
  • Attach 2 electrodes under the chin (jaw) or on jaw muscle. (especially if facial hair is present)
  • Attach 1 electrode on the bony area behind each ear.
  • Plug these in using the “Plug In Page” or the figure below.
  • Following each wire from the attached location when plugging in is HIGHLY recommended.
  • Added Security: A one inch long piece of cloth tape will help keep electrodes in place during the night. If you are an active sleeper or sweat during sleep, it is recommended that you apply the tape to each electrode.
Image of face with plug in guide
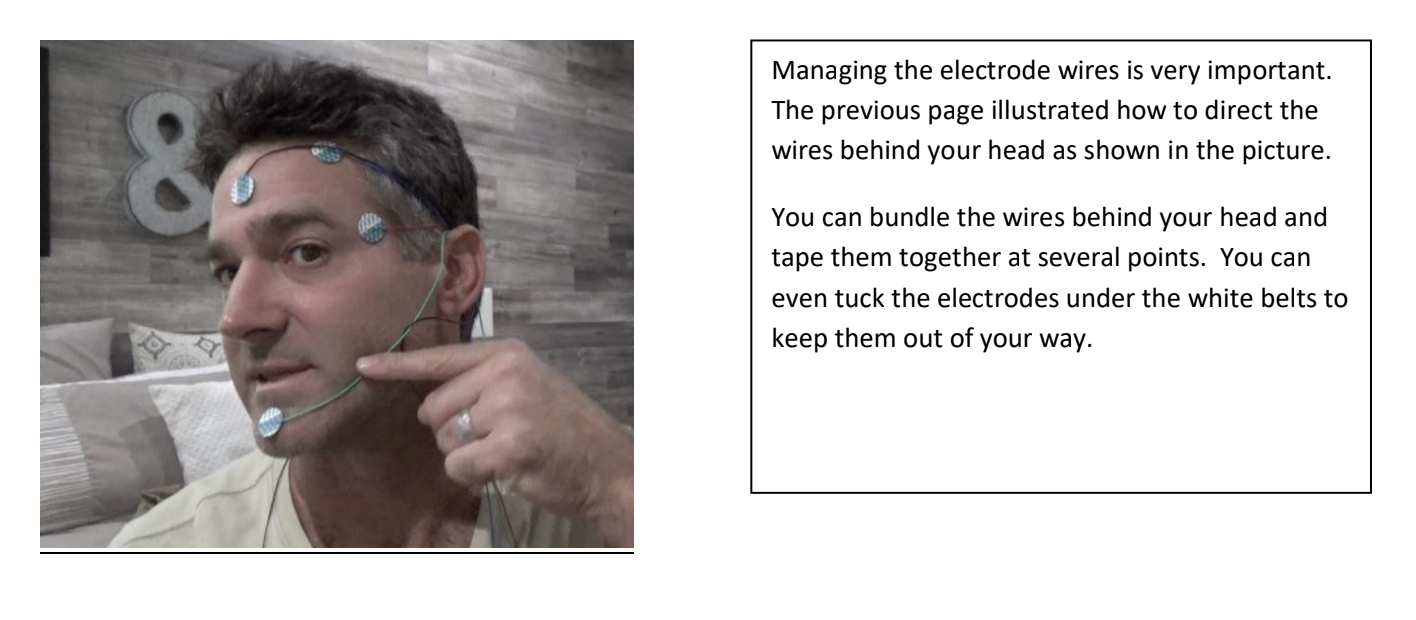
Man sleeping with test

Managing the electrode wires is very important. The previous
page illustrated how to direct the wires behind your head as shown in the picture. You can bundle the wires behind your head and tape them together at several points. You can even tuck the electrodes under the blue belts to keep them out of your way.

Image with tape
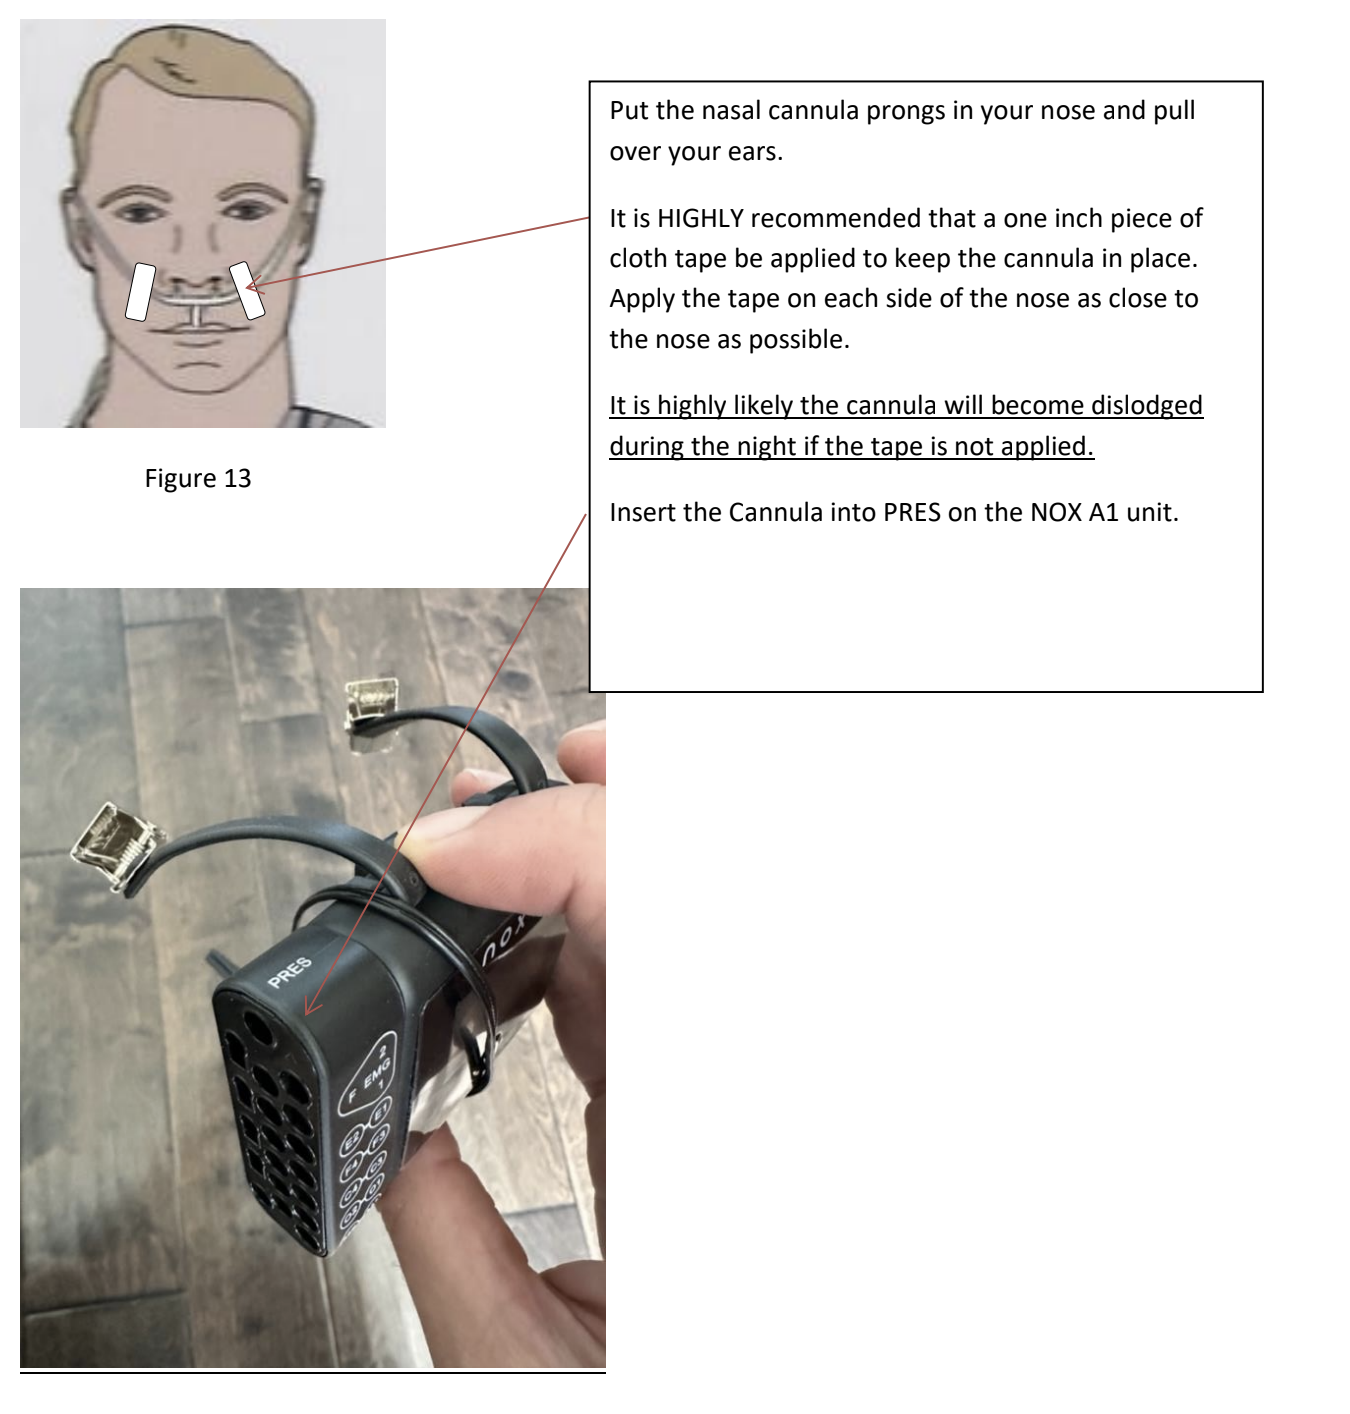
Put the nasal cannula prongs in your nose and pull over your ears. It is HIGHLY recommended that a one inch piece of cloth tape be applied to keep the cannula in place. Apply the tape on each side of the nose as close to the nose as possible. It is highly likely the cannula will become dislodged during the night if the tape is not applied. Twist the cannula into the luer lock on the top of the PDx module.

Put the nasal cannula prongs in your nose and pull over your ears.
It is HIGHLY recommended that a one inch piece of cloth tape be applied to keep the cannula in place. Apply the tape on each side of the nose as close to the nose as possible. It is highly likely the cannula will become dislodged during the night if the tape is not applied. Twist the cannula into the luer lock on the top of the PDx module.

Step 6:

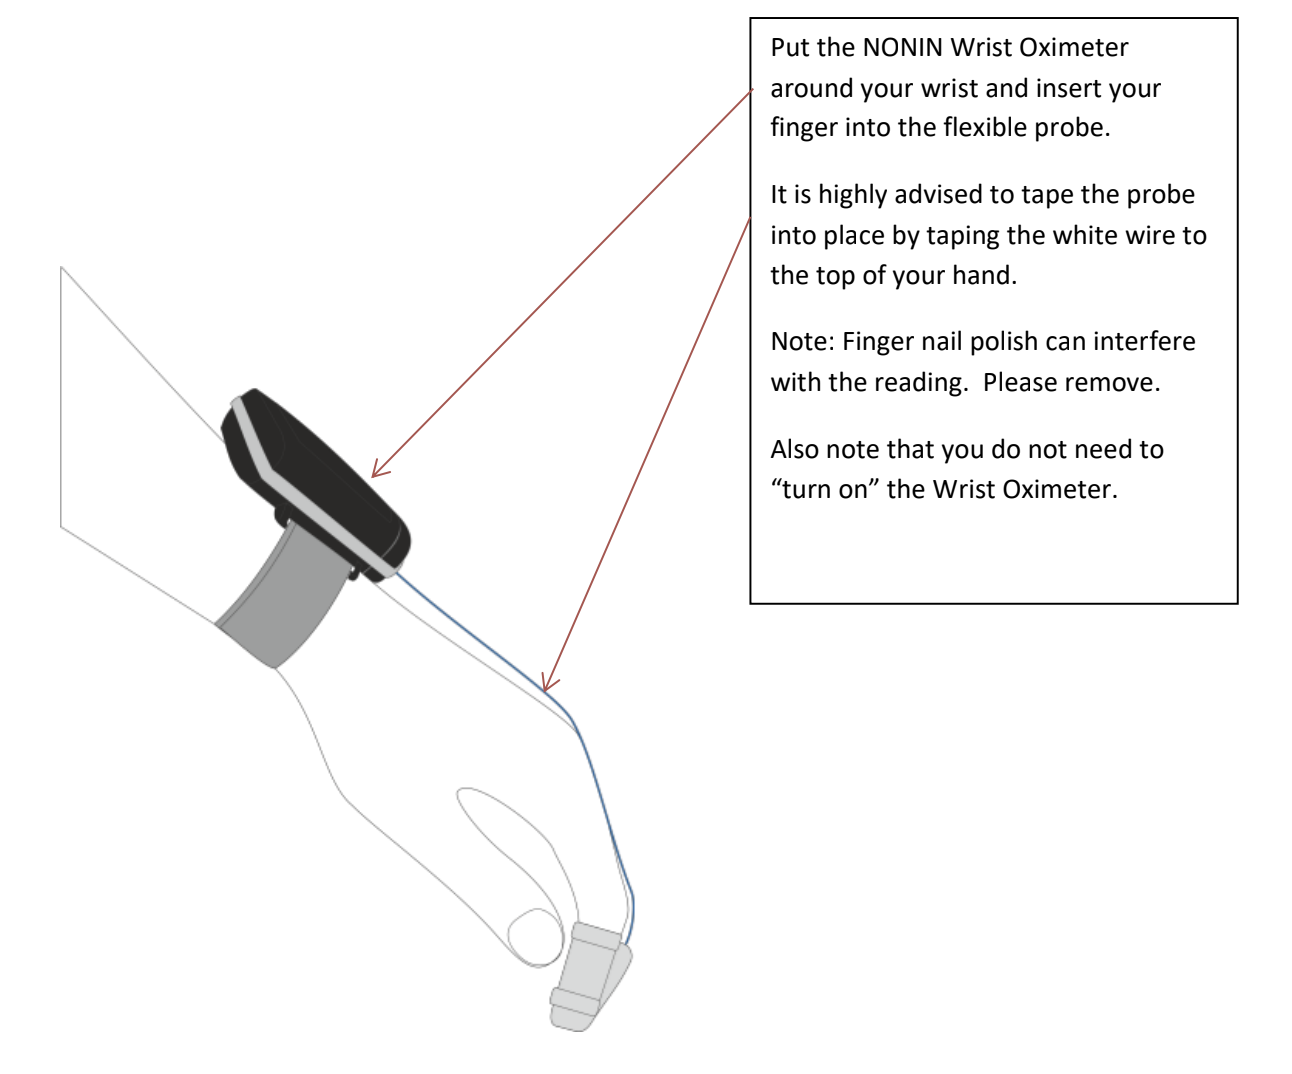
SPO2 (Finger) Probe application.

Figure 11</p>
<p>Figure 12</p>
<p>Place your finger in the Flexible SPO2<br />
probe. Use cloth tape on the finger<br />
to hold it in place.<br />
Note: Finger nail polish can interfere<br />
with the reading.

Place your finger in the Flexible SPO2 probe. Use cloth tape on the finger to hold it in place. Note: Finger nail polish can interfere
with the reading.

Plug the end of the SPO2 sensor into the Alice PDx Module. It is marked “SPO2”. Make sure it is pushed in straight and firm. (not like in the image)

Plug the end of the SPO2 sensor into the Alice PDx Module. It is marked “SPO2”. Make sure it is pushed in straight and firm. (not like in the image)

Step 7:

Starting the recording.

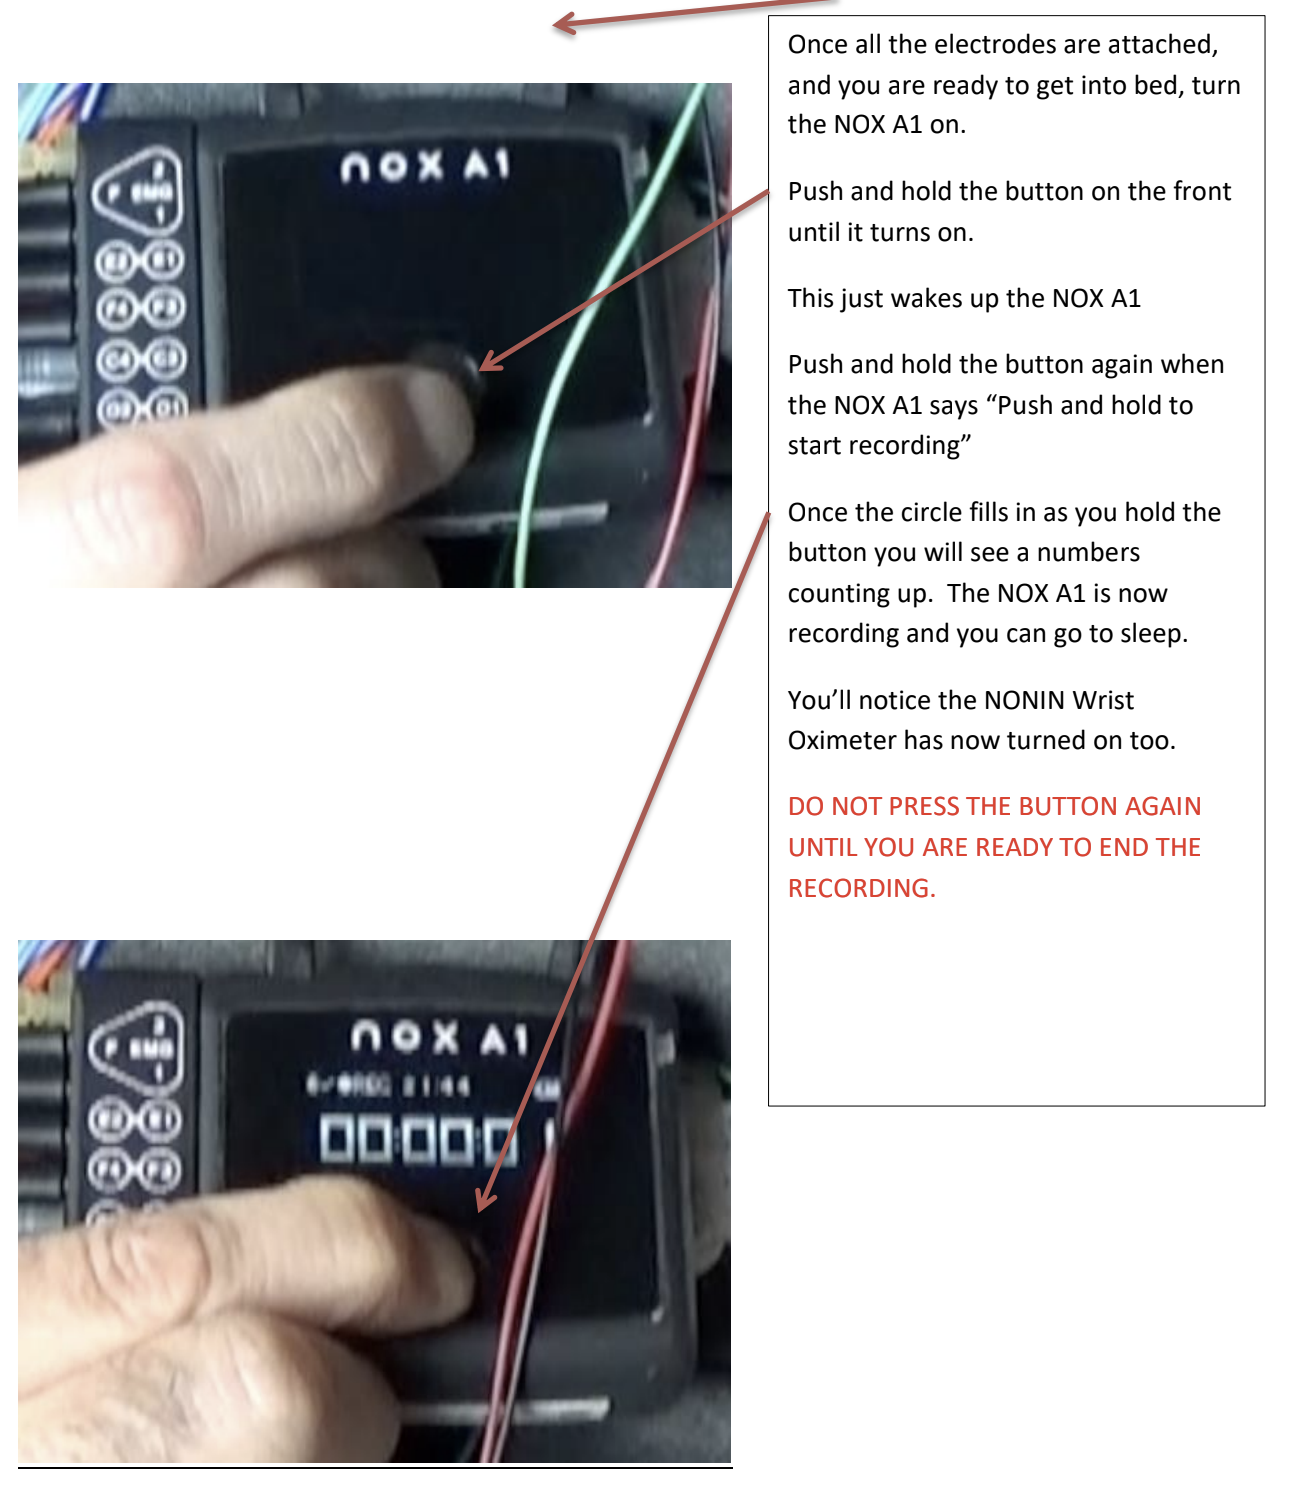
Once all the electrodes are attached, and you are ready to get into bed, turn the Alice PDx on. Open the Alice PDx by sliding the release on the top of the PDx and pulling open. Push the power button for about 1-2 seconds until the PDx turns on. It will begin a calibration<br />
sequence that can last several minutes. You don’t want to go through all this and forget to turn it on!!!

Once all the electrodes are attached, and you are ready to get into bed, turn the Alice PDx on. Open the Alice PDx by sliding the release on the top of the PDx and pulling open. Push the power button for about 1-2 seconds until the PDx turns on. It will begin a calibration sequence that can last several minutes. You don’t want to go through all this and forget to turn it on!!!

Once the calibration is finished, you will see the screen shown on the left.

Once the calibration is finished, you will see the screen shown on the left.

If any system is blinking on and off, or you see a yellow light flashing on the top of the PDx module, there is a problem with one of the signals.

In general: if yellow lights are blinking you can relax for 20-30 seconds without large movements and see if the signal is detected. If the yellow light does not stop blinking, please refer to the troubleshooting section at the end of this guide for more information on resolving these issues.

Step 8:

Ending recording.

Open the Alice PDx when you are finished sleeping.

Open the Alice PDx when you are finished sleeping.

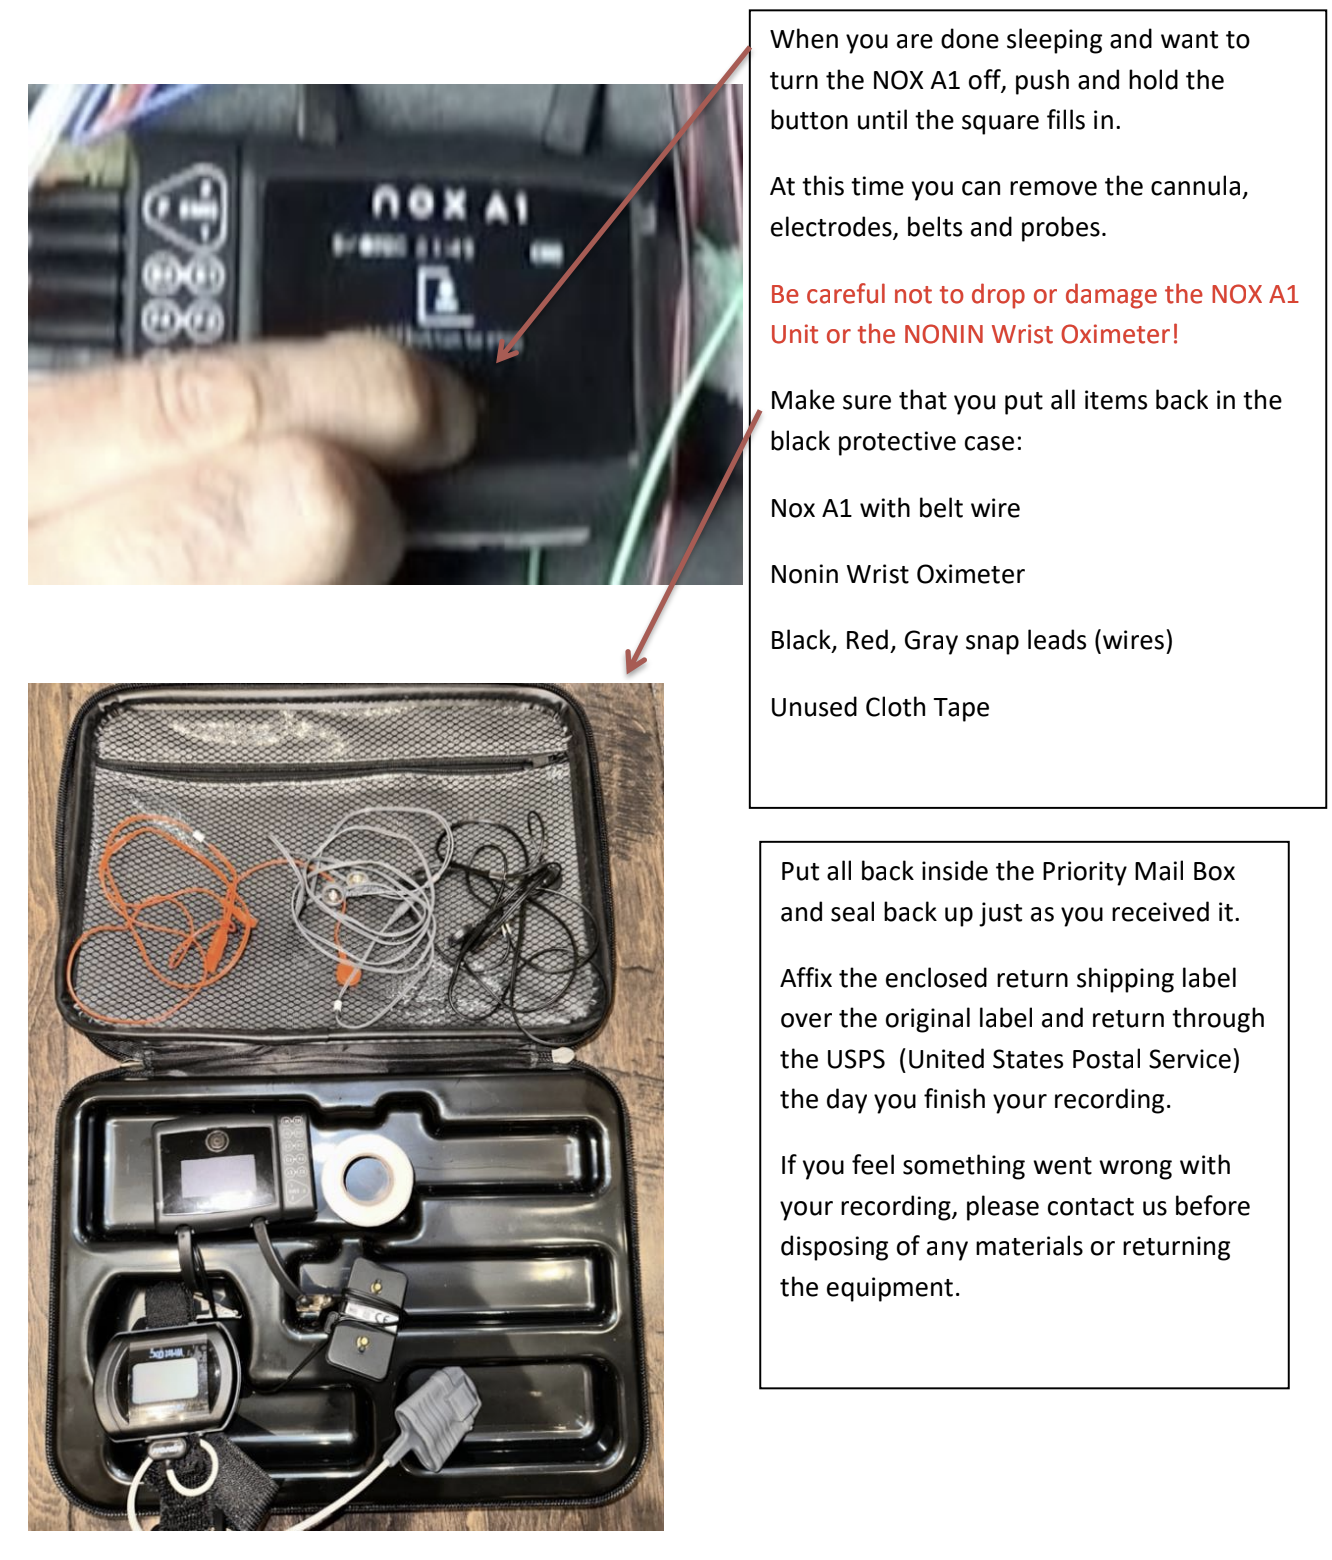
Push the button inside the PDx for 3-5 seconds (Figure 19). The display on the LCD screen will turn off.

At this time you can remove the cannula, electrodes, belts and probes.

Be careful not to drop or damage the Alice PDx Unit or yokes!

Unplug everything from the Alice PDx module except the PDx Holder

Place the PDx module and ExG and ECG yokes in the black protective case.

Place the following items in the clear plastic box inside the Priority MailBox: Blue Belts and white and blue belt wires, SpO2 Probe and Alice PDx holder and Lanyard (unless it’s still on the PDx) and tape and unused alcohol wipes.

Place the following items in the Black Padded Plastic Case in the Priority Mail Box: Alice PDx, two Alice PDx Yokes.

Put all back inside the Priority Mail Box and seal back up.

Affix the enclosed return shipping label over the original label and return through the USPS (United States Postal Service) the day you finish your recording.

Troubleshooting with the Alice PDx.

Troubleshooting with the Alice PDx.

A flashing yellow light on the top of the Alice PDx module is an indicationthat a sensor or electrode is not attached properly or has  become dislodged. To determine where the error is located, open the PDx and find the flashing signal on the LCD screen. Use the following Troubleshooting Guide to resolve the issue.

flashing signal on the LCD screen (Figure

Flashing Nasal Cannula
Cannula out of nose. Put back in.
Cannula unplugged from the top of PDx

Twist the cannula back in
(clockwise)

Flashing Thoracic Belt
Belt too loose. Attempt to tighten belt.
Belt wire unplugged Plug belt wire back in to the belt, or the PDx Module

Flashing Abdominal Belt
Belt too loose. Attempt to tighten belt.
Belt wire unplugged. Plug belt wire back in to the belt, or the PDx Module.

Flashing SpO2
Probe off finger Secure back on finger.
Laying on arm or finger probe. Change position.
SpO2 unplugged from PDx. Plug back in to PDx.
Fingernail polish obstructing signal.

Remove polish or place on a finger or toe without polish.

Flashing ExG
Electrode dislodged. Reattach electrode at site (head) or ExG module.

Flashing ECG
Electrode dislodged. Reattach electrode at site (torso) or ECG module.

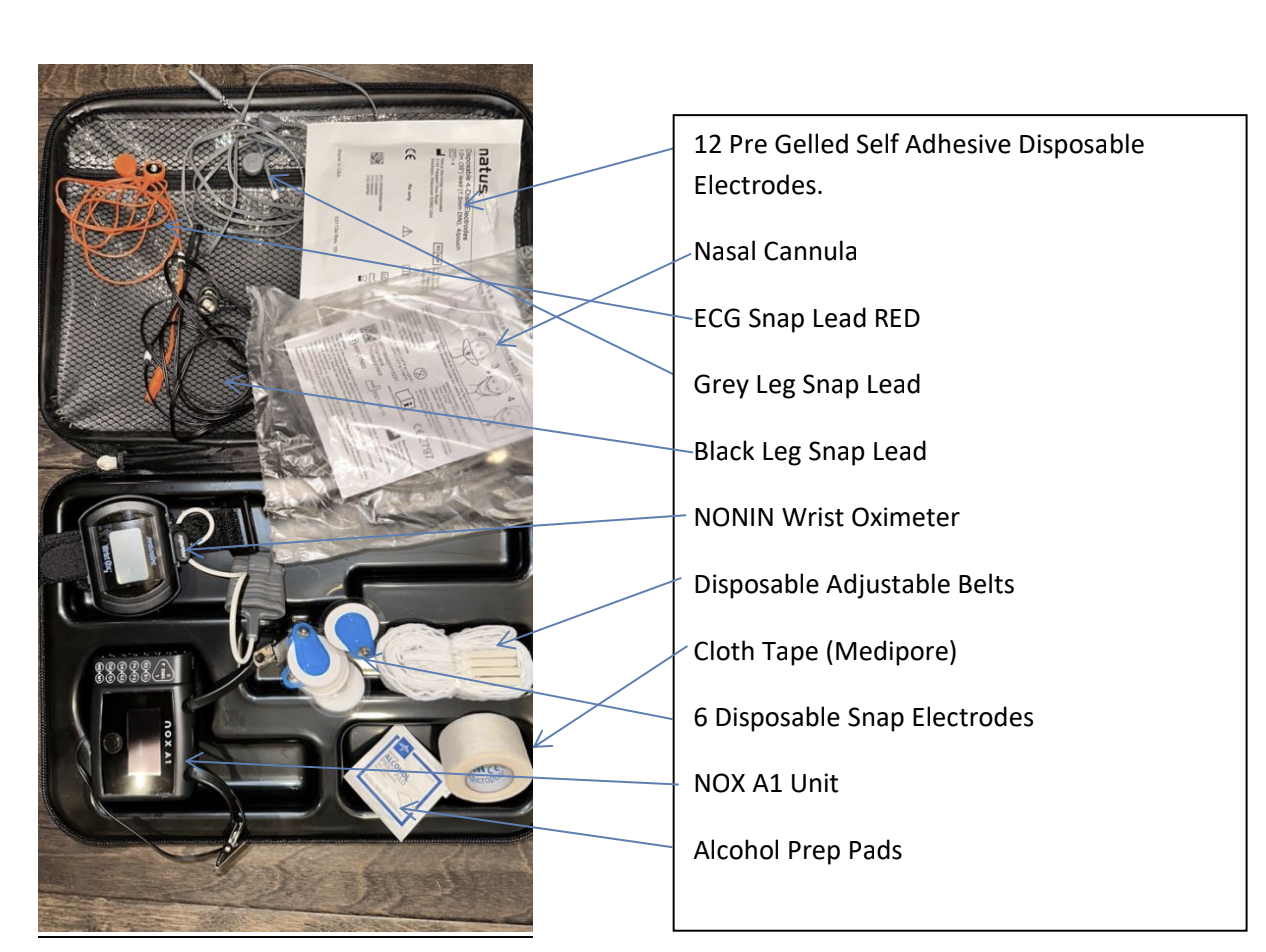
AXG Sleep Diagnostics Contents List

Alice PDx Holder and Lanyard.<br />
Alice PDx Module.<br />
EcG Yoke</p>
<p>ExG Yoke<br />
Respiratory Belt
  • Alice PDx Holder and Lanyard.
  • Alice PDx Module
  • EcG Yoke
  • ExG Yoke
  • Respiratory Belt
Cloth Tape (Medipore)<br />
Plastic Tape (Transpore)<br />
8 inch Nasal Cannula<br />
16 Pre Gelled Self Adhesive Disposable<br />
Electrodes.<br />
• 9 electrodes for face.<br />
• 3 electrodes for the torso.<br />
• 4 longer electrodes for legs.</p>
<p>2 Belt Wires<br />
One SpO2 Probe
  • Cloth Tape (Medipore)
  • Plastic Tape (Transpore)
  • 8 inch Nasal Cannula
  • 16 Pre Gelled Self Adhesive Disposable Electrodes.
  • 9 electrodes for face.
  • 3 electrodes for the torso.
  • 4 longer electrodes for legs.
  • 2 Belt Wires
  • 1 SpO2 Probe

Electrode Plug In

Guide to where the electrodes plugs in.

Alice PDx Holder and Lanyard. Alice PDx Module. EcG Yoke ExG Yoke Respiratory Belt